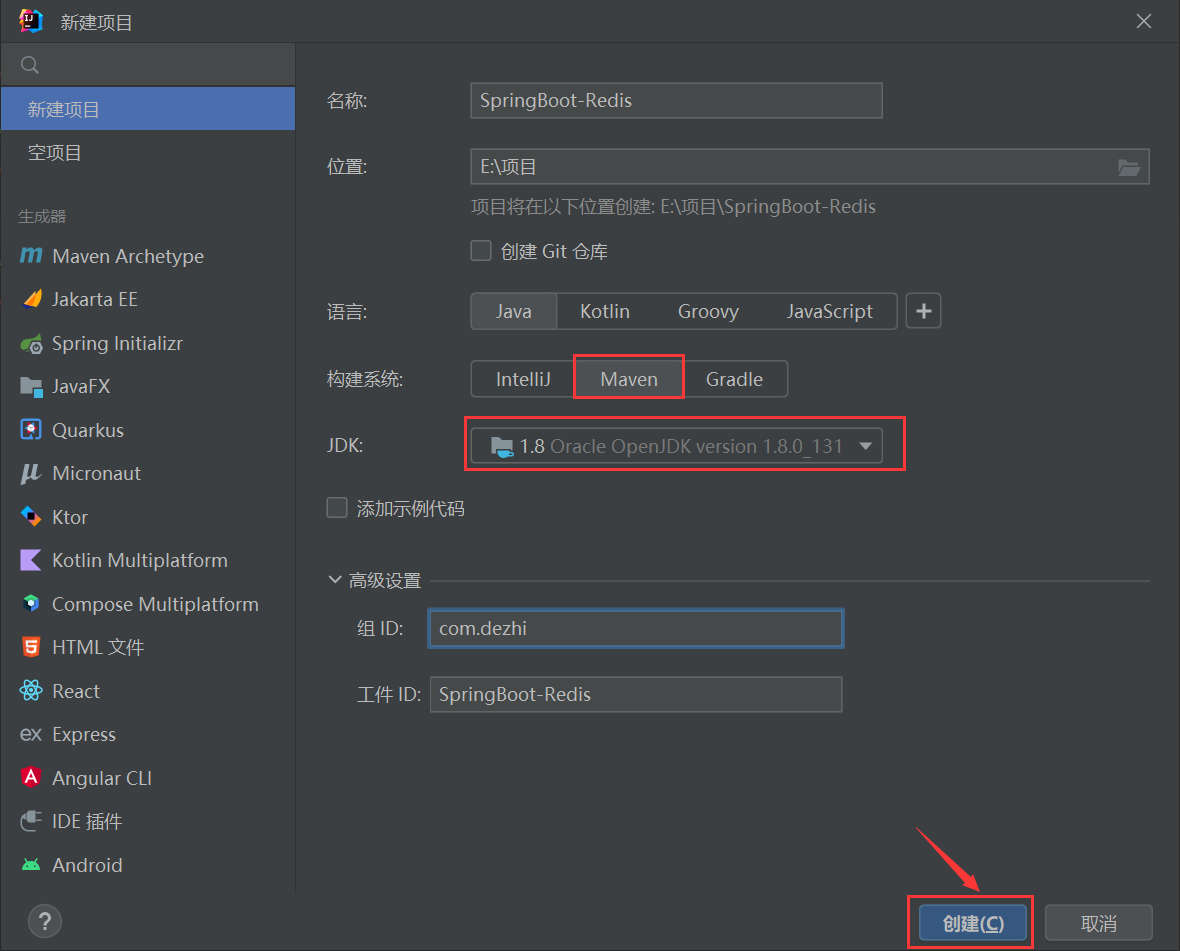
新建Maven工程
导入依赖
在pom.xml中导入相关依赖
1
2
3
4
5
6
7
8
9
10
11
12
13
14
15
16
17
| <parent>
<groupId>org.springframework.boot</groupId>
<artifactId>spring-boot-starter-parent</artifactId>
<version>2.3.4.RELEASE</version>
</parent>
<dependencies>
<dependency>
<groupId>org.springframework.boot</groupId>
<artifactId>spring-boot-starter-data-redis</artifactId>
</dependency>
<dependency>
<groupId>org.springframework.boot</groupId>
<artifactId>spring-boot-starter-test</artifactId>
</dependency>
</dependencies>
|
创建启动类
1
2
3
4
5
6
| @SpringBootApplication
public class Application {
public static void main(String[] args) {
SpringApplication.run(Application.class, args);
}
}
|
创建配置文件,配置redis相关信息
在resource目录下创建application.yml配置文件,redis配置如下
1
2
3
4
5
6
7
8
9
10
| spring:
redis:
host: 127.0.0.1
password:
port: 6379
database: 0
|
自定义序列化
redis默认使用JdkSerializationRedisSerializer进行序列化,序列化结果对我们的观察不友好,如设置key为"hello",value为"world"的键值对,在redis中呈现的结果如下

对此,我们需要对redisTemplate进行自定义序列化,配置文件结构如下。注意,配置文件必须在主类所在包或其子包下,否则SpringBoot会扫描不到我们的配置类
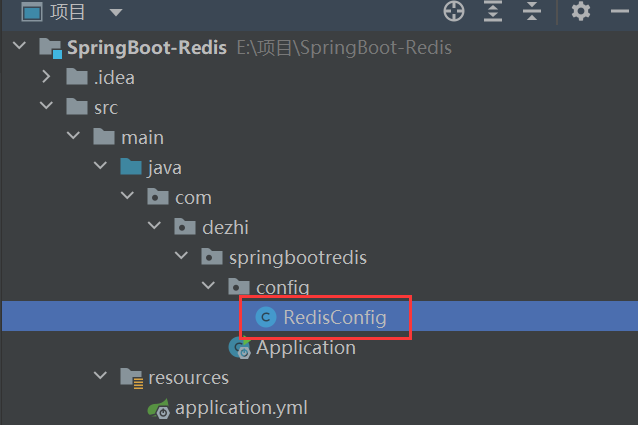
配置类RedisTemplate内容如下
注意方法名必须为redisTemplate,否则配置无效
1
2
3
4
5
6
7
8
9
10
11
12
13
14
15
16
17
18
19
20
21
| @Configuration
public class RedisConfig {
@Bean
public RedisTemplate<String, Object> redisTemplate(RedisConnectionFactory redisConnectionFactory) {
RedisTemplate<String, Object> redisTemplate = new RedisTemplate<>();
redisTemplate.setConnectionFactory(redisConnectionFactory);
RedisSerializer<String> stringSerializer = redisTemplate.getStringSerializer();
redisTemplate.setKeySerializer(stringSerializer);
redisTemplate.setHashKeySerializer(stringSerializer);
redisTemplate.setValueSerializer(stringSerializer);
redisTemplate.setHashValueSerializer(stringSerializer);
return redisTemplate;
}
}
|
测试
这里我们使用juit进行测试
添加上**@SpringBootTest和@RunWith(SpringRunner.class)**注解,只有这样,我们才能使用SpringBoot的强大功能,对RedisTemplate进行属性注入
1
2
3
4
5
6
7
8
9
10
11
12
| @SpringBootTest
@RunWith(SpringRunner.class)
public class RedisTest {
@Resource
RedisTemplate<String, Object> redisTemplate;
@Test
public void test01() {
redisTemplate.opsForValue().set("hello", "world");
}
}
|
测试结果:整合成功!


